Perspective 101
Whatever you have to do, you have to do something else
first.
Murphy's Law

|
|||||||||||||
Start |
Open new image 800 x 600, background color transparent.
This gives you a large canvas to create in. Rename Layer 1 something like Scenery or BG (background). The easiest way is to left double left click on Layer 1 and type in the title of your label. You can leave the layer blank until you're finished with the remaining layers on a "real house". |
||||||||||||
Don't forget to save your work after creating each layer! |
|||||||||||||
New Layer: Front |
Set your foreground color: none. Background color: blue, a bright one. The easiest way to load selection 01Front. The alternative is to draw a rectangle by double clicking on the rectangular selection icon on the Tool Options toolbar. Left=100 Top= 300 Right=400 Bottom=500 Antialias=checked Feather=0 or 1 Don't deselect. (If you do, CTRL+Z, will undo it.) Holding down the SHIFT key, click once on the rectangular selection tool on the toolbar and choose the triangle selection type. Draw a triangle from 200 on the left vertical ruler and 100 on the top horizontal ruler, to 300 on the left ruler and 400 on the top ruler. In other words, you start from directly above the left side of the rectangle, then pull down diagonally until you meet the top right side of the rectangle. The two shapes should
intersect. If they don't, undo (CTRL+Z) to get the rectangle selection
back and try again. |
||||||||||||
New Layer: Back |
Duplicate the Front layer and select the blue part
with the magic wand. Flood fill with black. Rename the layer Back. We'll assume that in the perspective of this house, the back seems smaller than the front. From the Image menu, choose Resize. Percentage of original = 85%. Resize type: Smart size. Make sure that "Resize all layers" is NOT checked, but that the "Maintain aspect ratio" box IS checked. Click OK. Deselect. (CTRL+D.) Using the Mover tool, move the smaller black triangle right until the middle of the gable top is at about 400. Move the Back layer under the Front layer. |
||||||||||||
New Layer: Side. |
The easy way is to load selection 02Side from disk. You
can also do the following. Draw a rectangular selection that starts on the right straight side of the blue front to the right side of the black back wall, and down to the bottom of the blue wall Change the BG color to red or some other color. Flood fill by right clicking. Deform the side so that the top and bottom walls are even. (Hold the SHIFT key down and move the top right handle down for the top and the bottom right handle down for the bottom. Deselect. It doesn't matter where you moved the Back or how much you reduced the Back. This perspective is now based on the correct vanishing point. |
||||||||||||
New layer: Roof.
|
Draw a rectangular selection from front peak to over the
back peak and down to the red side. Flood fill the rectangle with green or something equally gaudy. You can also try a pattern or a texture to see if the result comes out correctly. Deform the roof by holding the SHIFT key and moving the center left handle so that the shape follows the angle of the gable. If you need help with the Deformation Tool. see Jaddell's tutorial. Then hold the SHIFT key and move the top right handle so that the back peak of the roof just covers the peak of the back of the house. Experiment with getting all four corners of the roof to cover the front and the back of the house. |
||||||||||||
|
|
You can bring the Back
layer to the top to see if the roof covers it correctly. Note the smallest
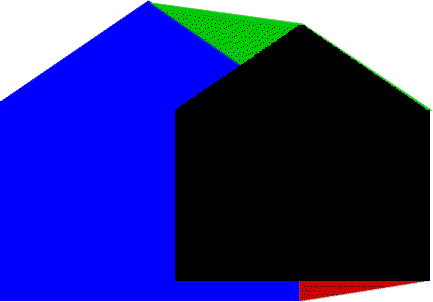
touch of green roof in the picture on the left, which is easily corrected. There's no selection for the roof because you might need to practice with the Deformation Tool. Since you have the back of the house to guide you, your line of sight can be anywhere, so it seems as if you're looking up or down or straight forward. Make your own experiments. |
||||||||||||
|
|||||||||||||
| For an excellent tutorial on PSP perspective, see Prof's Tut at PSPUG. | |||||||||||||
