 |
|||||||||||
|
Whatever can go wrong will go wrong, and at the
worst possible time. |
|||||||||||
|
|
|||||||||||
| This tutorial will show you how to save time
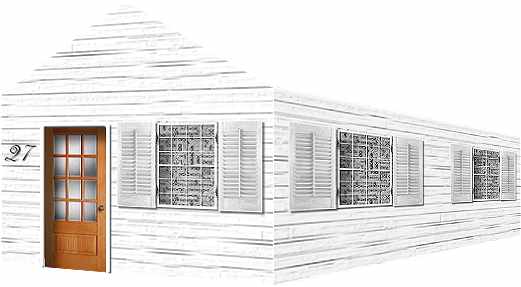
and trouble with perspective. As you can see, it gives you a house without
a roof, perfect if you're fond of rain or snow. Tutorial 3 shows you how
to put the roof on. This was done in Paint Shop Pro, version 7.0, but the premise can probably be used with any other version. This tutorial assumes you are relatively proficient with PSP. |
|||||||||||
| Download selections here. | Download images here. | ||||||||||
|
|||||||||||
Start |
Open a new image 800 x 600, background color transparent.
This gives you a larger canvas to create in. You can always crop the
picture later. Rename Layer 1 to something like Scenery or
BG (background). The easiest way is to double click on Layer 1
and type in the title of your label. Set your foreground color: none. |
||||||||||
Don't forget to save your work after creating each layer! |
|||||||||||
New Layer: Front |
Selection=01Front Flood fill with white by right clicking. From the Effects menu, choose Texture effects, Texture Texture=Boards 4.bmp Size=200% Smoothness=0 Depth=1 Ambience=0 Shininess=0 Color=white (#FFFFFF) Angle=315 Intensity=50 Elevation=30 |
||||||||||
New Layer: Door |
Copy the image supplied. Selection=02Door Paste the door into the selection. (SHIFT+CTRL+L). Do NOT deselect. Invert selection. (SHIFT+CTRL+I) |
||||||||||
New Layer: Door shadow |
Use a Drop shadow Vertical=15 Horizontal=15 Opacity=50 Blur=15 Deselect. Why put the shadow on its own layer? If you don't like it later, you can change it. |
||||||||||
New Layer: Door frame |
Selection=03DoorFrame Flood fill with white. Deselect. Use an Inner bevel Round bevel (2nd, top row) Width=10 Smoothness-0 Depth=4 Ambience=15 Shininess=0 Color=white Angle=315 Intensity=50 Elevation=35 |
||||||||||
New Layer: Window |
Copy the image supplied. Selection=04Window Paste into selection. The shadows are already there so you don't need too many layers in this tut. |
||||||||||
New Layer: House number (optional) |
Using the text tool, put a number to the left of the front door. | ||||||||||
|
|||||||||||
|
|||||||||||
New layer: Side |
Selection=05Side Flood fill with white or whatever house color you like. Use the same texture effect that you used on the front. You could use a new layer for the windows, but since you're not putting much on the side, you don't have to this time. Copy the window image supplied and line it up with the window on the
front. I used two windows on the side. If you like, you can pull down a
guide from the top ruler to help. |
||||||||||
|
|||||||||||
Deforming the Front layer |
Move your horizontal guide to 475. The easiest way is to
double click the handle of the guide that you used to line up the windows
and change the 400 to 475. Set a vertical guide to 125. Highlight the Front layer. Using the deformation tool, hold CTRL while you grab the top left corner and drag it down so that the lower left corner reaches up to the horizontal guide. Apply. You'll notice that the window and door look a bit too wide. Using the deformation tool again, take the center left handle and move it to the vertical 125 guide. Sometimes it's easier to use the Deformation Tool a couple of times to make sure you get each step right. Use Effects, Sharpen, Sharpen. |
||||||||||
Deforming the Side layer |
Do the same with the Side, except change your
horizontal guide to 450. Use your eye to see how to resize it by moving
the middle right handle. Don't forget Effects, Sharpen, Sharpen. |
||||||||||
|
|||||||||||
